1228 views
フォアグラウンドサービスのサンプルプログラムを記す。
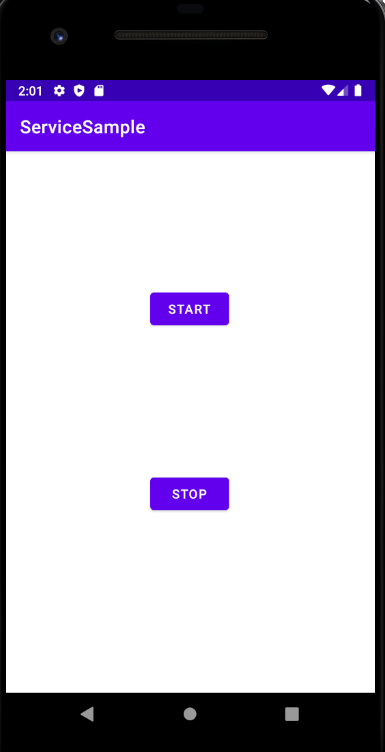
作るプログラムの動作

AndroidManifest.xml
<?xml version="1.0" encoding="utf-8"?>
<manifest xmlns:android="http://schemas.android.com/apk/res/android"
    package="com.konishisoft.servicesample">
    <uses-permission android:name="android.permission.FOREGROUND_SERVICE" />
    <application
        android:allowBackup="true"
        android:icon="@mipmap/ic_launcher"
        android:label="@string/app_name"
        android:roundIcon="@mipmap/ic_launcher_round"
        android:supportsRtl="true"
        android:theme="@style/Theme.ServiceSample">
        <activity android:name=".MainActivity">
            <intent-filter>
                <action android:name="android.intent.action.MAIN" />

                <category android:name="android.intent.category.LAUNCHER" />
            </intent-filter>
        </activity>
        <service android:name=".MyForegroundService" />
    </application>
</manifest>
重要なのは、4行目の<uses-permission android:name="android.permission.FOREGROUND_SERVICE" />と
19行目の<service android:name=".MyForegroundService" />である。
activity_main.xml
画面にボタンを二つ定義しているだけ。startボタンを押せばサービスが起動し、stopボタンを押せばサービスが停止するようにする。
<?xml version="1.0" encoding="utf-8"?>
<androidx.constraintlayout.widget.ConstraintLayout xmlns:android="http://schemas.android.com/apk/res/android"
    xmlns:app="http://schemas.android.com/apk/res-auto"
    xmlns:tools="http://schemas.android.com/tools"
    android:layout_width="match_parent"
    android:layout_height="match_parent"
    tools:context=".MainActivity">

    <Button
        android:id="@+id/startbutton"
        android:layout_width="wrap_content"
        android:layout_height="wrap_content"
        android:text="start"
        app:layout_constraintBottom_toBottomOf="parent"
        app:layout_constraintHorizontal_bias="0.498"
        app:layout_constraintLeft_toLeftOf="parent"
        app:layout_constraintRight_toRightOf="parent"
        app:layout_constraintTop_toTopOf="parent"
        app:layout_constraintVertical_bias="0.273" />

    <Button
        android:id="@+id/stopbutton"
        android:layout_width="wrap_content"
        android:layout_height="wrap_content"
        android:text="stop"
        app:layout_constraintBottom_toBottomOf="parent"
        app:layout_constraintHorizontal_bias="0.498"
        app:layout_constraintLeft_toLeftOf="parent"
        app:layout_constraintRight_toRightOf="parent"
        app:layout_constraintTop_toTopOf="parent"
        app:layout_constraintVertical_bias="0.644" />

</androidx.constraintlayout.widget.ConstraintLayout>
MyForegroundService.kt
サービスプログラムのクラスである。
package com.konishisoft.servicesample

import android.app.PendingIntent
import android.app.Service
import android.content.Intent
import android.os.IBinder
import android.util.Log
import androidx.core.app.NotificationCompat

class MyForegroundService: Service() {
    override fun onBind(intent: Intent?): IBinder? {
        return null
    }
    override fun onStartCommand(intent: Intent?, flags: Int, startId: Int): Int {
        /* val notification = NotificationCompat.Builder(this).apply {
             mContentTitle = "通知のタイトル"
             mContentText = "通知の内容"
             setSmallIcon(R.mipmap.ic_launcher)
         }.build()*/
        val openIntent = Intent(this, MainActivity::class.java).let {
            PendingIntent.getActivity(this, 0, it, 0)
        }
        var notification = NotificationCompat.Builder(this, 1234.toString())
            .setSmallIcon(R.mipmap.ic_launcher)
            .setContentTitle("これはタイトルです")
            .setContentText("これは内容です")
            .setContentIntent(openIntent)
            .setPriority(NotificationCompat.PRIORITY_DEFAULT)
            .build()

        Thread(
            Runnable {
                while(true){
                    Log.d("konishi", "test")
                    Thread.sleep(1000)
                }
            }).start()

        startForeground(1, notification)

        return START_STICKY
    }

    override fun stopService(name: Intent?): Boolean {
        return super.stopService(name)
    }
}
基本的に32行目~36行目に追加したい処理を追加すればよい。
ちょっと最初に躓くのは、23行目~29行目のNofiticationCompatの扱い。
これは、サービスが起動したときに、通知を行う処理。
これがないと、うまく動かない。
何故こんな仕様になっているかというと、従来のアプリでサービスを利用すると、ユーザが気づかない状態で動いていることがある。
だから、悪意のあるサービスプログラムを仕掛けられていても、ユーザは気づきにくい。
つまり、サービスが稼働していますよ、というのをユーザに知らせることを強制する仕様になった、ということ。
恐らく、中国で勝手にデータを送信するプログラムがあるというのがたびたび問題になっていたので、それがトリガーとなってこのような仕様になったのではないかと勝手に理解している。
MainActivity.kt
package com.konishisoft.servicesample

import android.app.NotificationChannel
import android.app.NotificationManager
import android.content.Context
import android.content.Intent
import android.os.Build
import androidx.appcompat.app.AppCompatActivity
import android.os.Bundle
import android.util.Log
import android.widget.Button

class MainActivity : AppCompatActivity() {
    override fun onCreate(savedInstanceState: Bundle?) {
        super.onCreate(savedInstanceState)
        Log.d("konishi", "start")
        setContentView(R.layout.activity_main)
        createNotificationChannel()
        val startbutton = findViewById<Button>(R.id.startbutton)
        startbutton.setOnClickListener {
            val intent = Intent(this, MyForegroundService::class.java)
            startForegroundService(intent)
        }
        val stopbutton = findViewById<Button>(R.id.stopbutton)
        stopbutton.setOnClickListener {
            val intent = Intent(this, MyForegroundService::class.java)
            stopService(intent)
        }
    }

    private fun createNotificationChannel() {
        if (Build.VERSION.SDK_INT >= Build.VERSION_CODES.O) {
            val channel = NotificationChannel(
                    1234.toString(),
                    "お知らせ",
                    NotificationManager.IMPORTANCE_DEFAULT).apply {
                description = "お知らせを通知します。"
            }
            val notificationManager = getSystemService(Context.NOTIFICATION_SERVICE) as NotificationManager
            notificationManager.createNotificationChannel(channel)
        }
    }
}
19行目~23行目がstartボタンを押したときにサービスプログラムが起動する処理。
24行目~29行目がstopボタンを押したときにサービスプログラムが停止する処理。
18行目は、通知のチャンネルを開く処理。関数自体は31行目以降に定義している。
Page 9 of 19.
[添付ファイル]
お問い合わせ
すぺぺぺ
自己紹介
本サイトの作成者。
プログラムは趣味と勉強を兼ねて、のんびり本サイトを作っています。
フレームワークはdjango。
ChatGPTで自動プログラム作成に取り組み中。
サイト/ブログ
https://www.osumoi-stdio.com/novel/